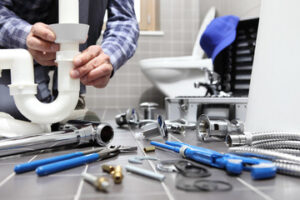
Plumber Sarasota installs, maintains, and repairs plumbing systems. These may be in homes, commercial or industrial buildings, or public facilities. Plumbers must be familiar with a wide range of tools and systems.
They also inspect and test plumbing systems for safety, functionality, and compliance with regulations. To succeed as a Plumber, you need excellent customer service skills and strong critical thinking abilities.
The faucet handle is one of the most visible components of a water fixture, so when it starts to crack or wear, it can be a big deal. Replacing the handle can give your sink a fresh new look and help with overall maintenance and upkeep. However, removing and installing the handle is a job for a professional plumber. It can be dangerous to work with water under pressure, and it’s best to leave this task to a licensed plumber for safety and efficiency reasons.
Before you remove your old handle, turn off the water supply valve under the sink to prevent any accidental water leaks. You may also want to wrap a towel around the drain to protect your floors and counters from splashes or spills.
If your faucet has a decorative cap that covers a screw, use a screwdriver to pry it off and expose the handle set screw. Once you have the screw removed, pull up on the handle to remove it from the faucet. A screwdriver is often enough to loosen the set screw, but if it’s stuck, try using penetrating oil or gently tapping with a mallet.
Once you’ve got the handle off, it’s time to inspect and repair the internal parts. Check the washer and O-ring for wear and tear, as these are common culprits for leaks. If the washer is cracked or damaged, you can replace it with a new washer from a local hardware store. A new O-ring is also available for purchase, and it’s a good idea to change it when you replace the washer.
If your faucet is leaking from the cartridge, it’s a good idea to replace the cartridge as well. This is another job that can be done without the help of a professional, but it’s important to take your time and ensure the cartridge is seated correctly in the faucet body. Once you’ve replaced the cartridge, reassemble the entire faucet and test it for functionality and proper seating. If the handle still won’t seat or the cartridge is leaking, it’s best to call a professional plumber for further inspection and replacement.
Faucet Seat Replacement
The valve seat is the component in a faucet that creates a seal when water flows through it. A worn out valve seat can lead to a leak, and can be repaired by replacing it. Replacing a valve seat is relatively easy, but it requires that you shut off the water supply to the faucet. Once the water is off, you can remove the handle and then unscrew the faucet body to access the valve seat.
If the seat is a good match for the faucet, you can insert it and then screw it back in place using a clockwise turn. However, if the new seat is not an exact fit for the faucet, you may need to use tools like a valve seat grinder or dresser to reshape it in order to get a good seal.
Once the new seat is in place, you can screw the faucet body and handle back into place. Be sure to tighten the new valve seat firmly, but don’t over-tighten it. Once the faucet is reassembled, turn the water back on underneath and check for leaks and proper function.
Plumbers often work in residential homes, but they also work in many other types of buildings and environments. Commercial and industrial environments present different challenges for plumbers, who may need to deal with larger systems that serve multiple occupants. For example, a hospital or manufacturing plant may require complex plumbing equipment that needs to be installed, maintained, and repaired.
A career as a plumber requires a high school diploma or equivalent, and extensive on-the-job training. Most plumbers receive their education through an apprenticeship program, which lasts four to five years and includes both classroom instruction and paid on-the-job training. In addition to on-the-job experience, most states require that plumbers pass a licensing exam.
Plumbers must be able to think critically and solve problems quickly. They need to understand how systems work, and be able to read blueprints and other technical documents. They also need to have the physical strength to lift heavy equipment and tools. Lastly, they must be able to communicate with customers and explain their work in a way that makes sense to them.
Faucet Cylinder Replacement
Cartridge faucets are a special type of washerless faucet that uses a valve to control water flow and temperature. When this valve begins to wear out or lose its seal, it is time to replace the cartridge. While replacing a faucet cartridge can seem daunting, with some determination and basic tools, it is not difficult to do for most homeowners.
The first step is to shut off the water supply. This is usually accomplished by turning off the water at the valve located under the sink. Once the water is turned off, it is important to allow the faucet to drain completely before moving on to the cartridge replacement.
Next, the handle must be removed to gain access to the old cartridge. The handle is attached to the cartridge by a set screw or Phillips head screw that can be unscrewed with a screwdriver. Some handles are designed with a decorative cap that must be removed to expose the set screw. In this case, it is a good idea to use a strap wrench for extra leverage. After the handle and any caps are removed, it is necessary to remove the escutcheon. This is a flat plate that covers the screw or set screw and must be removed to reveal a brass retaining clip. This clip is typically U-shaped and surrounds two plastic tabs on the cartridge. It is necessary to note the precise orientation of these tabs so that the new cartridge can be installed in the same orientation. The retaining clip can be removed with a pair of pliers or a small screwdriver.
Once the retainer clip is removed, the leaking cartridge can be replaced. It is a good idea to lubricate the new cartridge with plumber’s grease before inserting it. This will help ensure that the cartridge fits correctly and that no water is leaking from the o-rings or other areas of the faucet body. Once the cartridge is inserted, it is a good idea to turn the water back on to test the new faucet.
If you are satisfied with the results, it is a good idea to label the faucet with the date of installation and any other relevant information. This will help you to track the life of the cartridge and anticipate when it will need to be replaced. It is also a good idea to keep an extra cartridge on hand for future emergencies.
Faucet Valve Replacement
A plumber’s duties include installing and repairing pipes that facilitate water, gas, or waste disposal in residential and commercial settings. They may also inspect a property’s plumbing systems to ensure they function properly. They must have certain soft skills to succeed in this career, such as communication and customer service.
One common plumbing repair involves replacing a shower valve cartridge. This type of fixture is a small component that’s located inside the shower handle, but it can cause major problems when it stops working. It’s important to shut off the water supply before attempting a replacement, and you should drain any remaining water in the pipes as well.
To begin, you’ll need a new valve cartridge and a few basic tools. First, remove the handle and escutcheon plate to expose the old cartridge. Once you’ve removed the old cartridge, replace it with the new one by screwing it into place and reattaching the handle. If the faucet has a metal clip that holds it in place, use needle-nose pliers to release it. Then, reattach the handle and trim plate. If the old escutcheon had a layer of calk securing it around its edges, apply a new layer using a caulking gun.
Another common type of plumbing repair is a faulty valve seat. This is usually caused by mineral deposits and sediment buildup that can wear away the surface of the valve seat. You can try to fix this by cleaning the valve seat with a steel wool pad, but this method isn’t always successful. A better option is to use a tool called a valve seat dresser, which is an inexpensive device that evens out a worn seat. Just be careful not to overdo it; you don’t want to wear away the entire seat.
You can avoid this problem by upgrading to a modern quarter-turn valve. These are less prone to leaks and lock ups, and they take only 30 minutes to install. You can buy them at your local hardware store. Before you start working, be sure to turn off the water at the main shutoff valve under your sink or in the house.